3 Ways to Add a Logo in Divi 5
I chose Adding a Logo to Divi 5 as the first tutorial for our Quick Vids tutorials for a reason. First if you have used Divi before but still consider yourself a beginner this shows you how things are still Divi familiar. If you have never used Divi before but are interested in giving it a go this will show you how easy it is to get the hang of using Divi 5. The one thing that every single site on the internet have in common is that they all need a logo. So let’s get right into this below.
1
1. Theme Options
Adding your logo this way is very familiar if you have worked with Elegant Themes Products in the past. If not it is easy to follow along. In the WP Admin dashboard under the 1.Divi heading look for 2.Theme Options and click it.
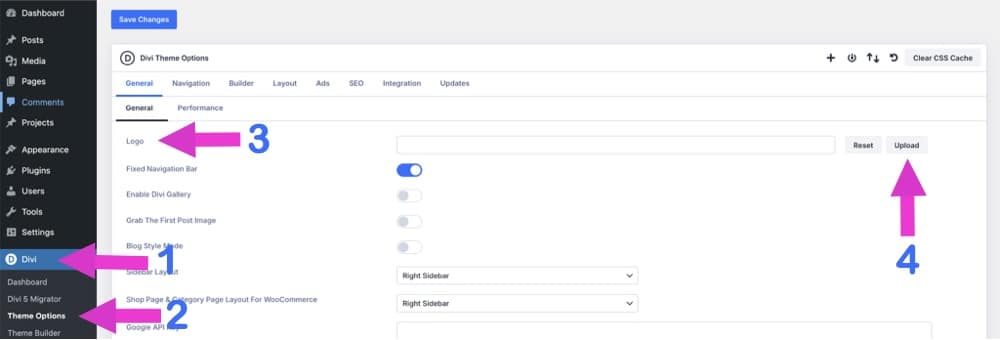
At the top of the Theme Options page note that the first option is labelled 3.Logo. Now click the 4.Upload button to either add a logo you have already added to the Media Library or upload it from your computer. This is kind of the old way to do this especially if you will be adding a menu to your header. We will talk about that next.
2
2. Theme Builder
While I put this method 2nd it is likely the way that Elegant Themes recommends themselves. Method 1 was the original way to add your logo even before Elegant released Divi. With this method you can add and control the look of your header menu as well. The other advantage to this method of course is that you can create your “Global Header” in the process.
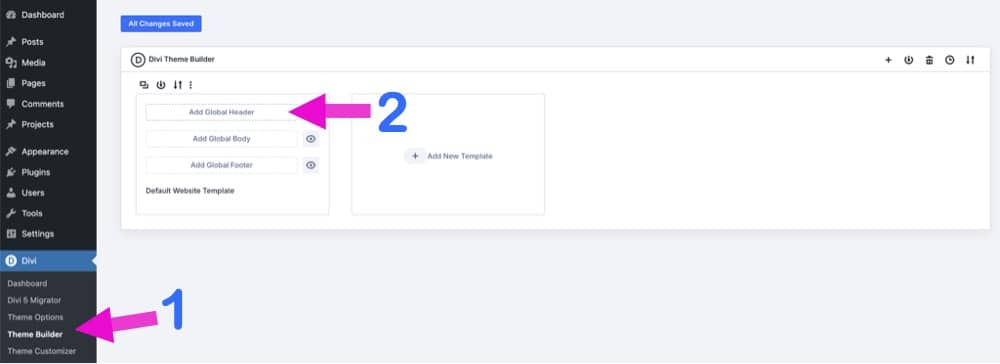
Let’s get started. Again head over to your wp-admin dashboard. This time find Divi > 1.Theme Builder. Once on the Theme Builder page you will see 2.Add Global Header

Clicking the Global Header button will present you with 2 options… Build Global Header and Add from Library… For the purposes of our tutorial you will select 3.Build Global Header

Now click the green 4.Add New Row button.
NOTE: We will get into the Section, Row and Module options in a later tutorial. For example If you have used Divi before you will notice that when you scroll over the black Add New Module button it now says Add New Module OR ROW. This is because of Divi 5’s awesome new Nested Rows options.
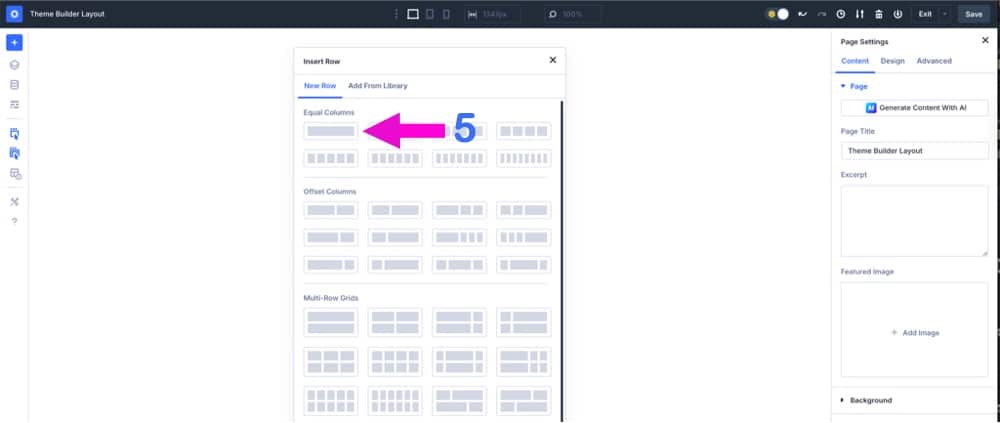
After Clicking the Add New Row button you will be presented with Divi 5’s updated row options. You have many options here and you can use the layout that works best for you. In this tutorial we will simply select the first option we see under the Equal Columns header 5.Full Row.

Next click the black + icon 6.Add New Module or Row options.
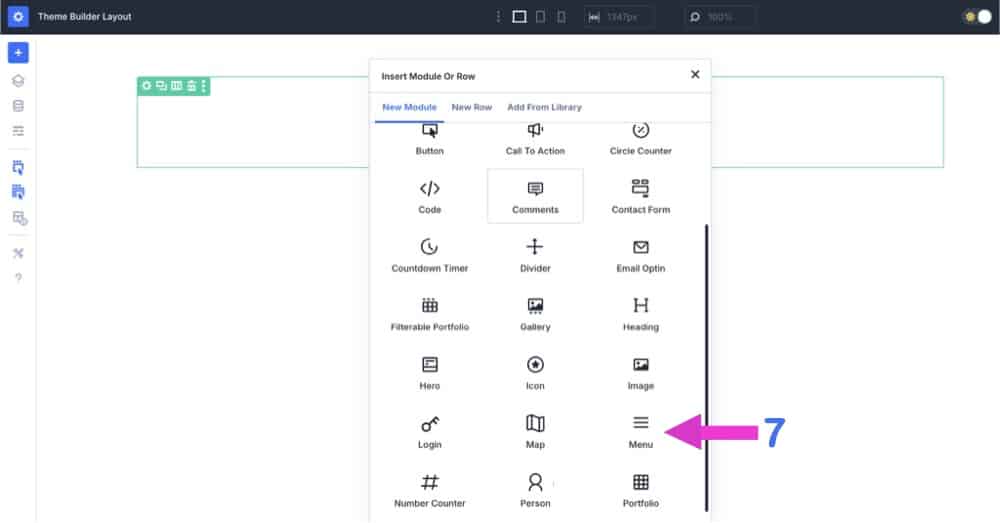
Now lets scroll down a bit and find the 7.Menu module.
In our final steps you will be presented with the default menu you have at the top of the page. If you look to the right column you will find a heading 8.Logo if you click this headers arrow it will open and you will see + Add Image. This is where you can upload your logo or add it from the Media Library if you already have it uploaded. You should see it now 9.Logo Image. Finally before you leave this page hit the 10.Save button.
3
3. Image Module
The third way we will do this is for those that DO NOT need a menu attached to their logo. Many of you will think that most people likely use method 2 for adding a logo. The thing about page design these days is that you should always design MOBILE FIRST and if you do that the placement of the menu can vary greatly. I actually used this 3rd method for DIVI.sale the site you are looking at. If you look at the top of this page you will see why that is. I wanted some of the menu items to display when the page was scrolled down. So, the line that the logo is on is different than the location of my top menu.
*IMPORTANT: So we dont just repeat ourselves over and over from method 2 above let’s do this… Follow the steps in method 2 from the images that are labelled from numbers 1 to 6.
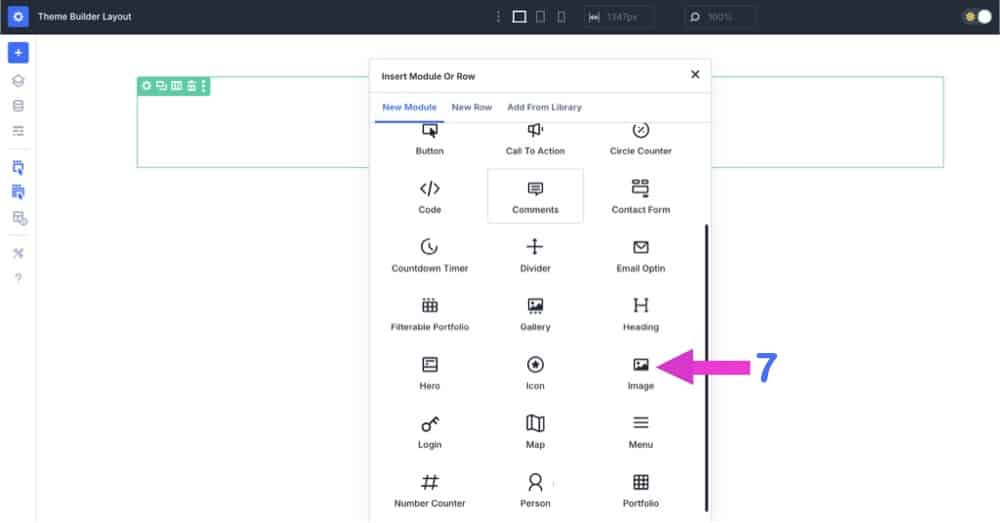
Before starting here be sure to follow the numbered steps from 1 to 6 from Method 2 above. Ok let’s get method 3 started with step 7. Scroll down and find module 7.Image.
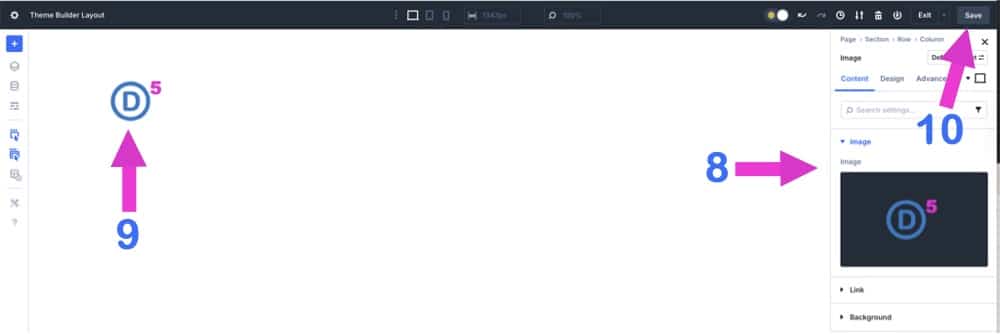
In our final steps look to the right column and find the heading 8.Image Click this header to open it and you will see + Add Image. This is where you can upload your logo or add it from the Media Library if you already have it uploaded. You should see it now 9.Logo Image. Finally before you leave this page hit the 10.Save button.
This brings our Divi 5 logo tutorial to an end. In the process of making this tutorial we discoved a few new features that we will discuss in upcoming tutorials. A great example of that is Divi 5’s new Rows and Column layouts. This was re-imagined to include nested columns. We will also be taking a look at Divi 5’s new Flexbox and Loop Builder to mention a few. So, stay tuned.